Setup and configuration
Kroconnect
Getting started with nShift Delivery
Last modified:
This guide takes you from a WooCommerce store with nShift as its shipping provider to a booked nShift Delivery shipment with a printed label.
nShift Delivery books shipments for orders where the customer has already picked an nShift service at checkout. So the setup has two halves: the booking side, which is the same for every store, and the checkout side, where you follow one of two paths depending on how nShift is shown in your checkout.
Set aside about 30 minutes, plus the time it takes Krokedil to set up your booking workflow.
Which path is yours?
| Your checkout | Your path |
|---|---|
| nShift’s shipping options are shown with the nShift Checkout 2.0 shipping method from the Kroconnect WooCommerce Connector. | Path A — nShift Checkout 2.0 |
| You use Kustom Checkout with Kustom Shipping Assistant, and Kustom Shipping Assistant is connected to nShift through nShift’s own integration (with either nShift’s older or newer checkout solution). | Path B — Kustom Shipping Assistant connected to nShift |
Two different Kustom Shipping Assistant setups. Kroconnect also has its own Kustom Shipping Assistant integration, where Kroconnect itself is the shipping provider Kustom asks for options. That is a different setup and is not covered here. Path B is for stores where Kustom Shipping Assistant gets its options from nShift.
Before you start
- A WooCommerce store with the Kroconnect WooCommerce Connector plugin installed and activated, and administrator access to WordPress.
- An nShift account with nShift Delivery. You need your sender Quick ID from nShift. If you want shipping notifications sent to your customers, the NOTSMS and NOTEMAIL addons must be active in your nShift account.
- A Kroconnect subscription that includes nShift Delivery.
- For Path A: an nShift Checkout 2.0 setup in nShift, with an API Client ID and Client Secret and at least one Connection ID.
- For Path B: Kustom Checkout and Kustom Shipping Assistant already working in your store, with Kustom Shipping Assistant connected to nShift.
Step 1 — Get your booking workflow from Krokedil
Shipments are booked through a Kroconnect workflow, which Krokedil sets up for you. Contact Krokedil support and ask for nShift Delivery to be set up for your store.
When it’s done, you get a Book shipment Workflow ID. Keep it at hand for the next step.
Step 2 — Enable nShift Delivery in WooCommerce
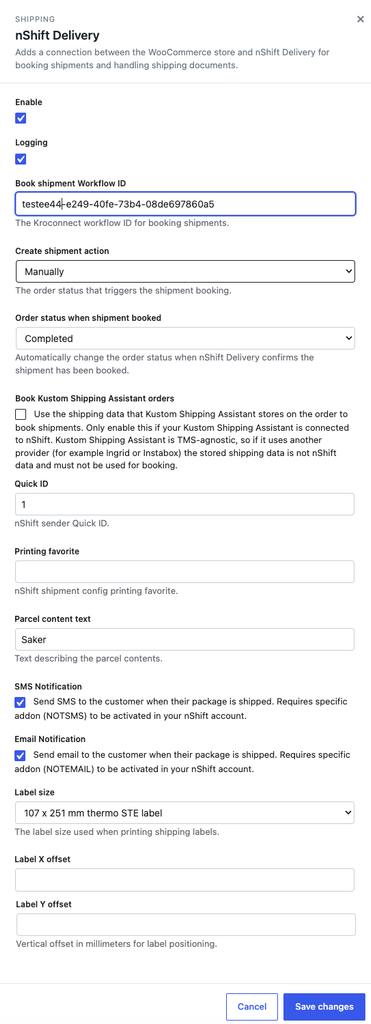
- In the WordPress admin, go to WooCommerce → Kroconnect → nShift Delivery.
- Tick Enable.
- Paste the Book shipment Workflow ID from Step 1.
- Enter your nShift sender Quick ID.
- Pick a Label size that matches your printer.
- Leave Create shipment action at Manually for now. You switch on automatic booking at the end of the guide, once a test booking has worked.
- Click Save changes.
Every setting is described on the nShift Delivery page.
Now continue with your path.
Path A — nShift Checkout 2.0
Step A1 — Set up nShift Checkout 2.0
If nShift Checkout 2.0 is already live in your checkout, skip to Step A2.
- Go to WooCommerce → Kroconnect → nShift Checkout 2.0, tick Enable, and enter your nShift Client ID and Client Secret, then click Save changes.
- Go to WooCommerce → Settings → Shipping, open a shipping zone and add the nShift Checkout 2.0 shipping method.
- Edit the method, enter your nShift Connection ID, and save.
nShift Checkout 2.0 describes these settings in more detail.
Step A2 — Configure your services
Each nShift service your customers can choose can have its own booking settings, such as a package code or a return service. You add them on the same nShift Checkout 2.0 shipping method.
- Edit the nShift Checkout 2.0 shipping method again and scroll down to the nShift Delivery section.
- Click Fetch services from nShift Checkout to open the panel.
- Pick a Country and Postcode you ship to, and click Fetch services. The panel tells you how many services nShift returned.
- Repeat with other countries, a heavier Weight or a higher Order value to find services that only show up for those. Services that are new to your store are added to the list.
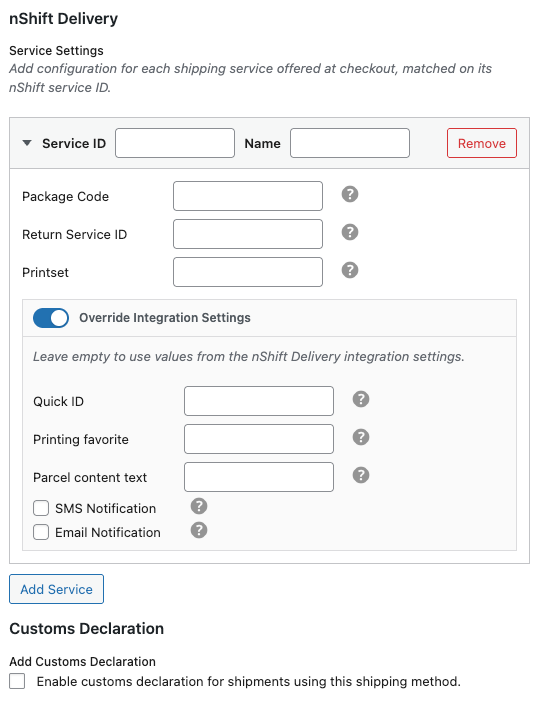
- Click Add Service, and in Service ID pick one of the suggested services. The Name is filled in for you.
- Fill in the Package Code, and a Return Service ID if you offer returns. Open Override Integration Settings only if this service should use another Quick ID, printing favorite or notification setting than the defaults.
- Repeat for each service, then click Save changes.
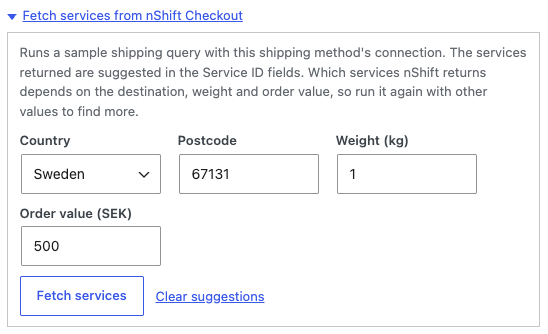
Service suggestions and the fetch panel require a version of the Kroconnect WooCommerce Connector later than 2.29.0. On earlier versions, type the service IDs from your nShift account.
Continue with Step 3 — Book a test shipment.
Path B — Kustom Shipping Assistant connected to nShift
Step B1 — Turn on booking of Kustom orders
When Kustom Shipping Assistant is connected to nShift, the customer’s choice is stored on the order by Kustom, not on the shipping line where nShift Delivery looks for it. This setting lets nShift Delivery pick it up from there.
- Go to WooCommerce → Kroconnect → nShift Delivery.
- Tick Book Kustom Shipping Assistant orders.
- Click Save changes.
Important! Only do this if your Kustom Shipping Assistant is connected to nShift. If it is connected to another provider, such as Ingrid or Instabox, the data Kustom stores is not nShift data and must not be used for booking.
Orders placed before you turned this on can be booked too.
Step B2 — Configure your services
With the setting on, the nShift Delivery section also appears on the Kustom Shipping Assistant shipping method.
- Go to WooCommerce → Settings → Shipping, open the shipping zone and edit the Kustom Shipping Assistant shipping method.
- Scroll down to the nShift Delivery section and click Add Service.
- In Service ID, start typing. The suggestions come from your latest 200 orders and from every new Kustom order. Pick the service you want to configure.
- Fill in the Package Code, and a Return Service ID if you offer returns.
- Repeat for each service, then click Save changes.
If no suggestions show up, your store has no Kustom orders with nShift data yet. Type the service IDs as they appear in your nShift account instead, or place a test order first and come back.
The Fetch services from nShift Checkout panel is not available here, since the Kustom Shipping Assistant method has no nShift Connection ID.
Step 3 — Book a test shipment
- Place a test order in your store and pick an nShift service at checkout — with a pickup point if the service offers one.
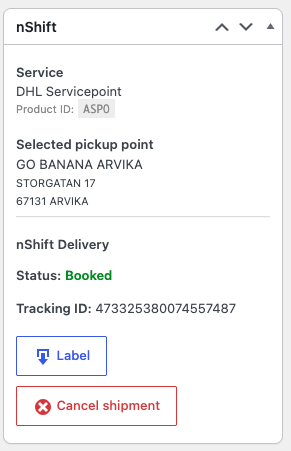
- Open the order in the WordPress admin. In the nShift Delivery box, the status is Not booked.
- Click Book shipment. An order note says Book shipment request sent to Kroconnect.
- Reload the order after a moment. When nShift has confirmed the booking, the box shows the Tracking ID and download buttons for the label and any other documents.
- Download the label and print it, to check the size and position.
If the label is slightly off on your printer, adjust Label X offset and Label Y offset in the integration settings.
If the box says Cannot be booked instead, the message underneath tells you why — see When an order cannot be booked.
Cancel the test shipment in nShift afterwards. Cancel shipment on the order only removes the booking from WooCommerce, not from nShift.
Step 4 — Switch on automatic booking
Once a test booking has worked, you can let orders book themselves:
- Go to WooCommerce → Kroconnect → nShift Delivery.
- Set Create shipment action to the order status that should trigger the booking — usually Processing.
- Optionally, set Order status when shipment booked — for example Completed — so orders move on by themselves when the shipment is booked.
- Click Save changes.
You can still book by hand from the order, or several orders at once with the Book nShift Delivery shipments bulk action in the order list.
Next steps
- nShift Delivery — every setting, customs declarations, bulk actions and cancelling.
- nShift Checkout 2.0 — the checkout side, and where the shipping data is stored on the order.