Getting started
Connections
Last modified:
Connections are normally created for you — during the Fraktjakt onboarding, or together with Kroconnect staff. What you do on this page afterwards is keep them up to date: change a setting, or replace credentials that have stopped working.
A Connection is a configured link to one specific system or account — your WooCommerce store, your Specter account, your Fraktjakt account. It holds the credentials Kroconnect uses to reach that system, plus the settings that belong to it. See How Kroconnect works for how Connections relate to Workflows.
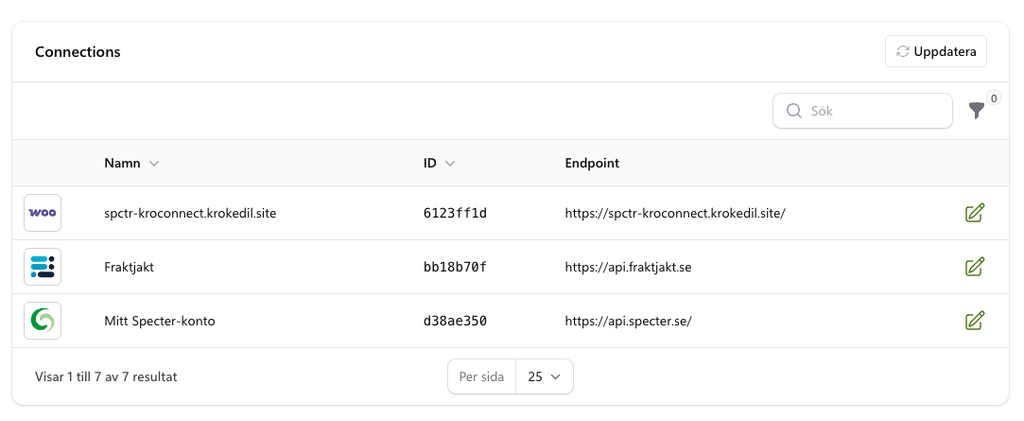
The Connections page in the Kroconnect app — app.kroconnect.com/connections — lists every Connection on your account and is where you edit them.
What the list shows
| Column | What it tells you |
|---|---|
| (icon) | The system the Connection points at — WooCommerce, Specter, Fortnox, Fraktjakt, and so on. |
| Name (“Namn”) | The name the Connection was given. With several stores or accounts of the same type, this is what tells them apart, so it is worth keeping descriptive. |
| ID | The Connection’s identifier, shortened for the list. Hover to see it in full, or click it to copy the whole ID — handy when Kroconnect support asks which Connection you mean. |
| Endpoint | The address Kroconnect calls. For WooCommerce this is your store URL. |
Use the Integration filter to narrow the list to one system, and Refresh (“Uppdatera”) to reload straight from Kroconnect if you suspect you are looking at cached data.
The icons at the end of each row are the actions: the pencil opens the Connection for editing, and for Fortnox a key icon appears as well — Activate OAuth (“Aktivera OAuth”), used to re-authenticate the Connection when Fortnox requires it.
Editing a Connection
Click the pencil icon, or the Connection’s name, to open Edit: [name] (“Redigera: [namn]”) in a panel at the side of the page.
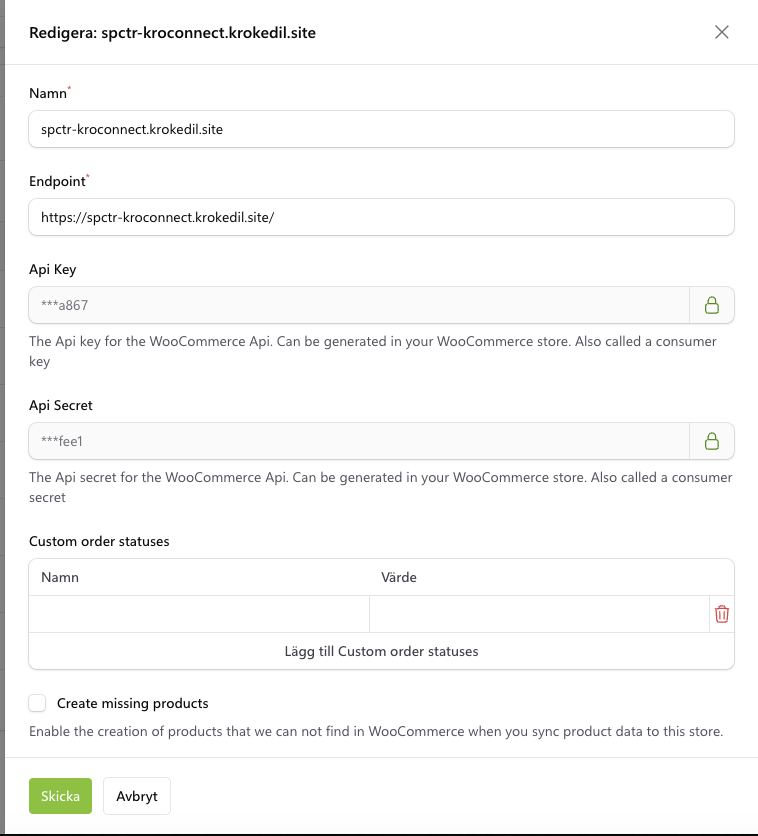
Every Connection has a Name and — for the systems that need one — an Endpoint. Below those come the settings for that particular system: Create missing products on a WooCommerce Connection, the warehouse to use on a Specter Connection, and so on. The set of fields differs per system, so the panel only ever shows what is relevant.
Save with the button at the bottom of the panel. You get a Connection updated (“Connection uppdaterad”) confirmation, and the change applies to the next run of every workflow that uses this Connection — runs already in progress are unaffected.
Secrets are masked
API keys, secrets and tokens are never shown in full. Their fields are locked, and show a masked value instead of the real credential.
To change one, click the padlock at the end of the field. The field unlocks and empties, and you type or paste the new value into it.
Unlocking clears the field. A secret you unlock but leave empty is saved as empty, which breaks the Connection. If you open a padlock by mistake, close the panel without saving and start again — nothing is written until you save.
Fields you leave locked are sent back to Kroconnect unchanged, so you can safely edit one setting without touching the credentials next to it.
Updating your WooCommerce API credentials
Kroconnect talks to your store over the WooCommerce REST API, using a consumer key and a consumer secret generated in WooCommerce. Those live on your WooCommerce Connection as API Key and API Secret.
You need to replace them when:
- the API key was deleted or revoked in WooCommerce;
- the WordPress user the key belongs to was deleted or lost its administrator rights;
- the key was created with Read permissions only, so Kroconnect can read from the store but not write to it;
- your logs show
401responses from the store — see Troubleshooting below.
Step 1 — Create a new API key in WooCommerce
Follow Creating WooCommerce API credentials below, and keep the consumer key and consumer secret at hand. Don’t delete the old key yet — wait until the new one is confirmed working.
Step 2 — Open the WooCommerce Connection
Go to Connections and click the pencil icon on your WooCommerce Connection. With more than one store on the account, check the Endpoint column to be sure you have the right one.
Step 3 — Check the Endpoint
Endpoint must be the address your customers use, including https:// and matching on www — https://example.com and https://www.example.com are not interchangeable. If your store has moved to a new domain, this is the field to update.
Step 4 — Replace the key and the secret
- Click the padlock on API Key and paste the consumer key (it starts with
ck_). - Click the padlock on API Secret and paste the consumer secret (it starts with
cs_).
Paste carefully — a trailing space is enough to make authentication fail. Both values have to be replaced together; a new key does not work with the old secret.
Step 5 — Save and verify
Save the panel. Then trigger something that uses the store — send a single order or sync one product from the WooCommerce admin — and check the run in the app: the request to your store should come back green with 200 OK. See Searching the logs for a product for how to find the run and read its logs.
Once you have a successful run, go back to WooCommerce → Settings → Advanced → REST API and revoke the old key.
Creating WooCommerce API credentials
These keys are not created automatically — you generate them in your own store.
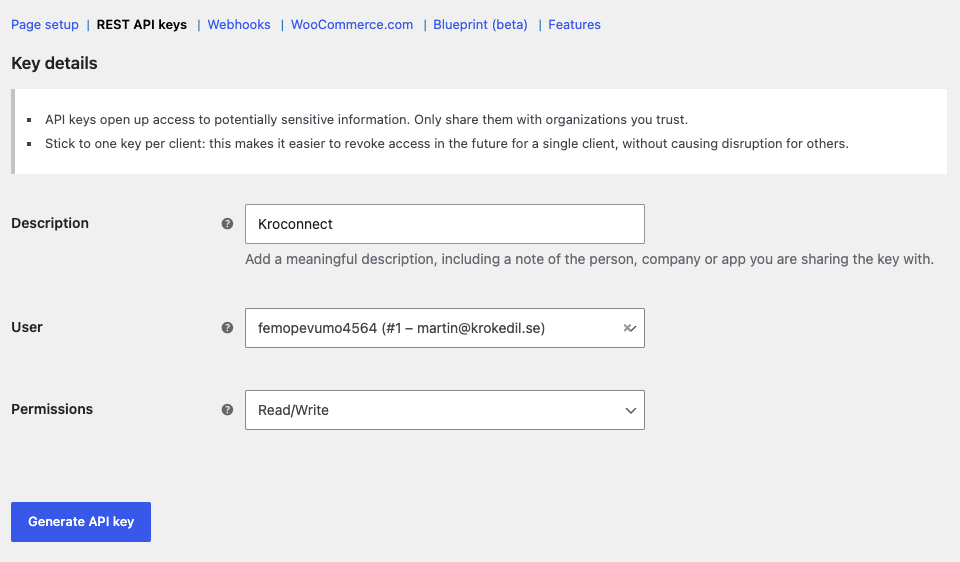
- In the WordPress admin, go to WooCommerce → Settings → Advanced → REST API.
- Click Add key.
- Enter a description (for example Kroconnect), select a user with administrator rights, and set Permissions to Read/Write.
- Click Generate API key.
- Copy the Consumer key and the Consumer secret.
Note! The consumer secret is only shown once. If you leave the page without copying it, you have to generate a new key. In Kroconnect these two values are the fields named API Key and API Secret.
Two things worth getting right while you are here:
- Read/Write is required. Kroconnect writes back to the store — order statuses, ERP order numbers, stock levels, product data — so a Read key will fail on everything but reading.
- Pick a user that stays. The key belongs to the WordPress user you select, and dies with it. Tie it to a permanent administrator account rather than to a personal login that may be removed when someone leaves.
Troubleshooting
The store answers 401 Unauthorized
The credentials are wrong, revoked, or belong to a deleted user. Generate a new Read/Write key and work through Updating your WooCommerce API credentials.
If a brand new key still gives 401, the request is most likely losing its authorization header before it reaches WooCommerce. That is a store-side matter: check any security or firewall plugin, and any redirect between http and https or between www and non-www, since credentials are dropped on redirect. See Firewalls, DNS and security products.
The store answers 403 Forbidden
First, look at the response body. If it is HTML — a Just a moment… page, or anything else that isn’t JSON — the request never reached WooCommerce, and this is not a credentials problem at all. Something in front of your store blocked it: see Firewalls, DNS and security products.
If the body is JSON from WooCommerce, the key authenticates but isn’t allowed to do what was asked — normally a Read-only key on a workflow that writes. Check the key’s permissions in WooCommerce; if they are wrong, generate a new one, as permissions can’t be changed after the fact.
The store answers 404 Not Found
Kroconnect reached the site but not the endpoint it expected. Check the Endpoint value, and that the Kroconnect WooCommerce Connector is installed and activated — several endpoints are added by the plugin. Re-saving permalinks in Settings → Permalinks is a standard fix when REST routes go missing.
Nothing reaches the store at all
If runs fail before any HTTP code comes back, the store isn’t reachable from Kroconnect’s servers. A site on localhost, or behind HTTP authentication, an IP allowlist or a firewall, can’t be called from outside. See Firewalls, DNS and security products for what to check, and why an IP allowlist can’t be made to work.
A setting won’t stick
Remember that changes apply on the next run. If a run that was already in progress used the old value, that is expected. Use Refresh (“Uppdatera”) to confirm what is actually stored on the Connection.
See also
- The Kroconnect app — what the app is and how the rest of it fits together.
- Searching the logs for a product — how to find a run and read what the store answered.
- How Kroconnect works — Connections, Workflows, mapping and triggers.
- Kroconnect WooCommerce Connector — the plugin that adds Kroconnect’s endpoints to your store.